
leave a message
If you are interested in our products and want to know more details,please leave a message here,we will reply you as soon as we can.


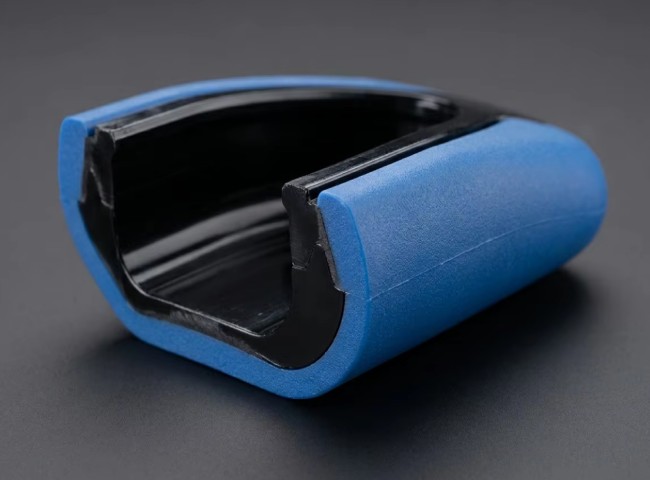
Take a look at your power tool's handle, your electric toothbrush, or the grip on your smartphone case. Notice how the hard plastic body transitions into a soft, tactile surface exactly where your hand makes contact? That's overmolding — and it's one of the most powerful yet frequently misunderstood techniques in injection molding. Done right, it creates products that are stronger, more comfortable, and impossible for competitors to replicate with single-material processes. Done wrong, it produces expensive failures where two materials separate under stress. Here's everything you need to know.
Overmolding is a two-shot injection molding process where a second material — typically a soft thermoplastic elastomer (TPE) or thermoplastic polyurethane (TPU) — is molded directly onto a rigid plastic substrate (the "substrate") to create a single, permanently bonded component.
Think of it as molecular-level Velcro. The two materials don't just touch — they form a chemical and mechanical bond at the interface. When executed correctly, the bond is stronger than the weaker of the two materials. You can't peel them apart.
These terms are often used interchangeably, but there's an important distinction:
|
Process |
What Happens |
Typical Use Case |
|
Overmolding |
A plastic is molded over another plastic |
Soft grip on a hard tool handle |
|
Insert Molding |
Plastic is molded around a metal or non-plastic insert |
Threaded brass inserts in a plastic housing |
At Yistar Plastic, we handle both. But for the rest of this article, we're focusing on plastic-on-plastic overmolding — the technique that creates the products you interact with every day.
There are two fundamentally different ways to overmold, and choosing the wrong one can double your tooling cost without improving quality.
How it works: A single injection molding machine with two injection units. The first unit injects the substrate material into the mold. The mold rotates or slides to a second station. The second unit injects the overmold material onto the still-warm substrate. The entire cycle happens in one machine, in one continuous process.
Advantages:
Strongest bond:
● Because the substrate is still hot when the overmold is applied, the two materials achieve maximum chemical adhesion
Highest precision:
● No re-handling means no alignment errors between the two shots
Fastest cycle time:
● One machine, one cycle, one finished part
Disadvantages:
Higher tooling cost:
● The mold must accommodate both shots, typically requiring a rotary platen or core-back design. Expect 30-50% higher mold cost than single-shot tooling.
Machine requirement:
● Requires a multi-shot injection molding machine (not all machines have this capability)
Design constraints:
● The mold design must allow material flow for both shots, which can limit geometric complexity
Best for: High-volume production (50,000+ units/year) where the amortized tooling cost is offset by cycle time savings and bond strength advantage.
How it works: The substrate is molded in a standard single-shot machine. It's removed, allowed to cool, and manually or robotically placed into a second mold. The overmold material is then injected onto the substrate.
Advantages:
Lower initial tooling cost:
● Two separate single-shot molds, each less complex than a 2K mold
Machine flexibility:
● Can run on standard single-shot machines
Design freedom:
● Less constrained by mold flow paths
Disadvantages:
Weaker bond:
● The substrate has cooled before overmolding, reducing chemical adhesion. Primarily mechanical bonding.
Lower precision:
● Manual or robotic placement introduces alignment variation
Longer cycle time:
● Two separate molding cycles, plus handling time
Best for: Low-to-medium volume production or when your existing machine fleet doesn't include 2K-capable equipment.
Not all plastics bond to each other. In fact, most don't. The success of your overmolding project depends entirely on selecting compatible material pairs.
|
Substrate |
Compatible Overmold |
Bond Mechanism |
Typical Applications |
|
ABS |
TPU, TPE-S |
Chemical bond (styrene compatibility) |
Power tool grips, electronic device bumpers |
|
PC/ABS |
TPU, TPE-S |
Chemical + mechanical |
Smartphone cases, medical device housings |
|
PP |
TPE-V, TPE-O, TPE-S |
Mechanical (requires surface treatment or mechanical interlocks) |
Automotive interior parts, appliance handles |
|
PA6/PA66 (Nylon) |
TPU, TPE-E |
Chemical (polar bonding) |
Power tool housings, sports equipment |
|
PC |
TPU, TPE-U |
Chemical (carbonate-urethane interaction) |
Electronic enclosures, medical devices |
|
PBT |
TPE-E, TPU |
Chemical (ester compatibility) |
Automotive connectors, electrical components |
Polypropylene is the most common injection molding material — and the most challenging to overmold. Its low surface energy means most TPEs won't chemically bond to it without surface treatment (corona, plasma, or flame treatment) or mechanical interlock features designed into the substrate.
At Yistar, we've developed proprietary surface preparation protocols for PP overmolding that achieve reliable bonds without post-molding treatment. More on that in the design section below.
Even with chemically compatible materials, mechanical interlocks dramatically improve bond reliability. The substrate should include features that the overmold material flows into and around:
Through-holes:
● Small holes in the substrate that the overmold flows through, creating a rivet-like mechanical lock
Undercuts:
● Recessed features in the substrate that the overmold fills, preventing peel-away separation
Ribs with dovetail profiles:
● Raised ribs on the substrate with a wider top than base, so the overmold grips them mechanically
For the overmold layer:
Minimum thickness:
● 0.5 mm (below this, flow becomes unreliable)
Ideal thickness:
● 1.0-3.0 mm (provides good tactile feel without excessive material use)
Maximum thickness:
● 5.0 mm (beyond this, cycle time increases without proportional feel improvement)
For the substrate, maintain the standard injection molding rule: keep wall thickness uniform to avoid sink marks and warpage. The substrate wall should be at least 1.5x the overmold thickness where they meet.
The gate for the overmold shot should be positioned so material flows across the bond interface, not just onto it. When material flows across the interface under pressure, it generates shear heating that improves chemical bonding.
Avoid gating directly onto the cosmetic surface of the overmold. Gate marks on the soft touch area are both visible and tactile — your end user will notice them.
Yes, TPE is flexible. No, that doesn't mean you can skip draft angles. A minimum 1° draft on the overmold cavity ensures clean demolding without stretching or tearing the soft material.
|
Defect |
Appearance |
Root Cause |
Fix |
|
Delamination |
Overmold peels away from substrate |
Incompatible materials or insufficient bond area |
Verify material compatibility; add mechanical interlocks; increase melt temperature of overmold |
|
Flash on Overmold |
Thin material bleed at parting line |
Excessive injection pressure or worn mold |
Reduce injection pressure; inspect and refurbish mold shut-offs |
|
Short Shot |
Incomplete fill of overmold cavity |
Insufficient injection pressure or blocked flow path |
Increase pressure; check gate size; verify melt temperature |
|
Sink Marks |
Depressions on overmold surface |
Overmold wall too thick over thin substrate |
leave a message leave a message
If you are interested in our products and want to know more details,please leave a message here,we will reply you as soon as we can.
|