



Prototype vs Production Tooling: Cost, Lead Time & When to Switch

Best purchase I’ve made this winter! The color and knitting are exquisite and it’s so comfy! Went from NYC to Miami without ever taking it off. Super cute!!
Prototype tooling exists to answer design questions cheaply. Production tooling exists to answer them profitably. Confusing the two is expensive in both directions: a single-cavity soft tool pushed into a 20,000-piece order runs out of capacity, while a hardened steel tool bought before the design is frozen locks in every open change request.
This article compares the three stages — prototype (soft) tooling, bridge tooling and production tooling — on cost, lead time, mold life and unit cost, then sets out the thresholds that tell you when to move between them.
Key Takeaways
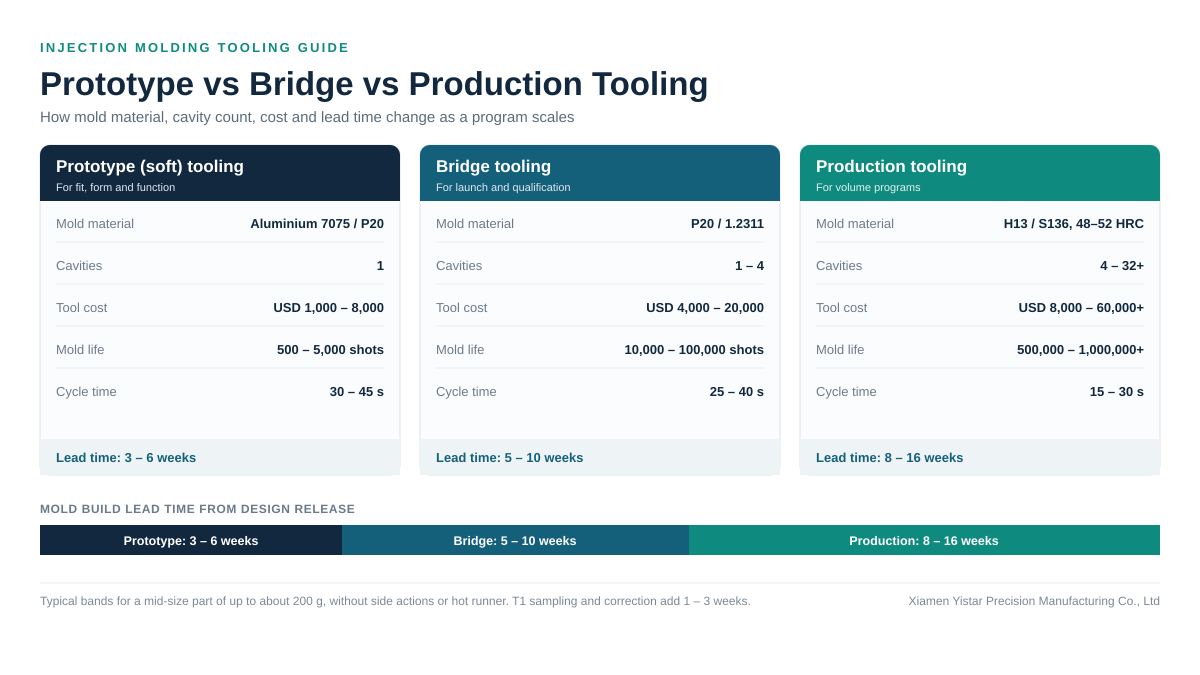
- Prototype tooling is normally cut in aluminium or unhardened P20 steel, produces roughly 500 to 5,000 shots, and typically costs USD 1,000 to 8,000 as a simple single-cavity tool for a mid-size part.
- Bridge tooling in pre-hardened steel (P20 or 1.2311) typically costs USD 4,000 to 20,000, produces 10,000 to 100,000 shots, and supplies parts while a production tool is still being engineered.
- Production tooling in hardened steel (H13, S136 or 1.2344 at 48–52 HRC) is typically quoted at USD 8,000 to 60,000 or more depending on cavity count, and is built for 500,000 to 1,000,000+ shots.
- Mold lead time is typically 3 to 6 weeks for prototype tooling, 5 to 10 weeks for bridge tooling and 8 to 16 weeks for a multi-cavity production tool, with a further 1 to 3 weeks of T1 sampling and correction.
- Switch to production tooling when annual volume exceeds roughly 5,000 pieces, when the part design has been frozen for at least one revision cycle, and when the unit-cost saving repays the tool investment within 6 to 12 months.
What Is the Difference Between Prototype, Bridge and Production Tooling?
Prototype tooling is built quickly and cheaply to deliver a small number of functional parts. Bridge tooling carries the program to volume with moderate tool life and cost. Production tooling is hardened, multi-cavity and built for the full program volume. The three differ mainly in mold material, cavity count, tool life and achievable cycle time.
Each stage answers a different question. Prototype tooling answers "does the design work?" — fit, form, function, assembly and whether the part survives the drop or thermal cycle the application demands. Bridge tooling answers "can we ship while the real tool is being built?" Production tooling answers "can we make this part at the cost the business case assumed, for the next three to five years?"
A tool is only as good as the process it is qualified on. Drying, melt temperature, injection profile, packing and ejection have to be settled before a T1 sample means anything, and that sequence is covered step by step in our guide to the injection molding process.
| Tooling stage | Typical mold material | Typical cavities | Typical tool cost | Typical mold life | Typical cycle time |
|---|---|---|---|---|---|
| Prototype (soft) tooling | Aluminium 7075 or unhardened P20 | 1 (sometimes 1+1) | USD 1,000 – 8,000 | 500 – 5,000 shots | 30 – 45 s |
| Bridge tooling | P20 / 1.2311 pre-hardened | 1 – 4 | USD 4,000 – 20,000 | 10,000 – 100,000 shots | 25 – 40 s |
| Production tooling | Hardened H13, S136, 1.2344 (48–52 HRC) | 4 – 32+ | USD 8,000 – 60,000+ | 500,000 – 1,000,000+ shots | 15 – 30 s |
These bands assume a mid-size part of up to about 200 g with no side actions and no hot runner. Every slider, lifter or hot-runner manifold adds to the tool price and to the maintenance load.
How Much Does Each Tooling Stage Cost?
A simple single-cavity prototype tool typically costs USD 1,000 to 8,000. Bridge tooling in pre-hardened steel typically costs USD 4,000 to 20,000. A hardened multi-cavity production tool typically costs USD 8,000 to 60,000 or more. Cavity count, part size, side actions, surface texture and steel grade account for most of the spread.
What drives those figures is not the mold base, which is largely a catalogue purchase, but the cavity work, cooling layout, ejection and finishing. Cavity count multiplies the cavity work but not the base, which is why unit tool cost per cavity falls as cavity count rises — and why over-cutting cavities for an uncertain volume is the most common tooling mistake in small programs.
| Cost driver | Typical effect on the tool price | How to keep it under control |
|---|---|---|
| Cavity count | Each added cavity increases cavity cost by roughly 15% to 35%, while the mold base is shared | Size cavities to the real annual volume, not to the best-case forecast |
| Sliders, lifters and unscrewing units | Roughly USD 800 – 3,000 per mechanism | Redesign undercuts as pass-through features where the function allows |
| Hot runner system | Adds roughly USD 2,000 – 12,000 or more, depending on drops | Justify it on runner scrap, colour changes and cycle time, not on convenience |
| Texture and etching | Roughly USD 300 – 1,500 per grain area | Standardise on one or two grain grades across the product family |
| Steel grade | Hardened grades add roughly 20% to 40% over P20 | Match steel grade to the required tool life rather than to habit |
| Tolerance and metrology | Tight GD&T can add gauges and inspection time | Freeze critical dimensions before the tool is ordered |
Unit cost, not tool cost, decides the stage: a bridge tool can carry a unit price 15% to 30% above a hardened production tool and still be the right purchase for 8,000 parts, because the capital it saves stays in the business if demand does not materialise.
Geometry drives those costs, and geometry is settled long before a purchase order is raised. Decisions such as the required draft angle per side, gate location and cooling layout determine how much cavity work, how many side actions and how much insert work a tool needs.
How Long Does Each Tooling Stage Take?
Prototype tooling typically takes 3 to 6 weeks from design release to T1 samples. Bridge tooling takes 5 to 10 weeks. A multi-cavity production tool takes 8 to 16 weeks, followed by 1 to 3 weeks of sampling and correction. Customer review and approval time is additional, not included in those figures.
| Stage | Typical duration | Key activity | What it de-risks |
|---|---|---|---|
| DFM review | 2 – 5 working days | Wall thickness, draft, gating, tolerance and material review | Expensive steel changes after the tool is cut |
| Prototype tool build | 3 – 6 weeks | Soft tool cut, T1 samples, dimensional report | Fit, form, function and assembly |
| Design freeze and order | 1 – 2 weeks | Revision closure, purchase order, steel and hot-runner ordering | Rework while the production tool is open |
| Production tool build | 8 – 16 weeks | Steel cutting, cavities, cooling circuits, hot runner, spotting | Unit cost and capacity |
| T1 sampling and correction | 1 – 3 weeks | Process tuning, first-article report, corrections | Part approval risk at PPAP stage |
Two traps account for most late programs: ordering steel before the design is frozen, which turns later changes into welding or EDM work, and treating a T1 sample as production-ready.
When Should You Switch from Prototype to Production Tooling?
Switch to production tooling when annual volume exceeds about 5,000 pieces, when the design has been frozen for at least one revision cycle, and when the unit-cost saving repays the tool investment within 6 to 12 months. Below that volume, prototype or bridge tooling usually carries less financial risk than an early steel commitment.
| Annual volume | Recommended tooling | Typical reasoning |
|---|---|---|
| Under 500 pieces | Prototype tooling, or CNC machining / 3D printing | Tooling investment cannot repay itself at that volume |
| 500 – 5,000 pieces | Prototype tooling, re-cut if the design changes | Soft tool life is adequate and the design may still move |
| 5,000 – 50,000 pieces | Bridge tooling in P20, 1 to 4 cavities | Best balance of tool life, lead time and unit cost |
| 50,000 – 500,000 pieces | Production tooling, 4 to 16 cavities, hardened steel | Cavity count drives unit cost down and justifies automation |
| Over 500,000 pieces | Production tooling, 16 to 32+ cavities, hot runner | Tool life, cycle time and scrap become the dominant costs |
Three conditions usually force the switch earlier than volume alone suggests:
- A certification or qualification requirement. Medical, automotive and appliance programs often need parts from the production tool, in the production material, for validation and PPAP submission.
- A tolerance a soft tool cannot hold. Aluminium tools wear at the gate and in high-flow areas, and dimensions drift as they do. Below ±0.05 mm on critical dimensions, a pre-hardened or hardened tool is the safer route from the start.
- A fixed launch date with a long steel lead time. If launch is 20 weeks away and a production tool needs 8 to 16 weeks to build plus correction time, the decision to order steel is already made today.
Material choice belongs in the same decision: shrinkage, melt flow and filler content decide whether a soft tool can hold the tolerances the drawing asks for, as set out in our guide to choosing the right plastic injection molding material.
At Yistar the tooling stage is reviewed together with part and mould design, whether the program is for Custom Engineering Plastic Components or custom consumer electronics projects, so cavity count, steel grade and DFM actions are agreed before a purchase order is raised. On enclosure programs, where tooling must also satisfy ingress-protection requirements, the sealing side is covered in our guide to selecting plastic electronic enclosure case kits.
For the wider sequence around a tooling decision — supplier selection, tooling approval and shipment — see our playbook for sourcing custom injection molding from China.
What Is Bridge Tooling and When Is It Worth It?
Bridge tooling is a low-cavity tool in pre-hardened steel, typically P20 or 1.2311, built to produce roughly 10,000 to 100,000 parts while a production tool is engineered. It is worth paying for when launch timing cannot wait for a 12 to 16 week steel tool, or when volume is still unproven.
Three situations justify it: a launch gap, where the market window opens before the production tool can be ready; demand uncertainty, where a 2-cavity bridge tool converts forecast into real order data for a fraction of the capital; and qualification lots, where PPAP or customer approval runs need parts from a stable tool.
It is the wrong choice in three matching cases. If volume is contracted and the design frozen, a bridge tool pays for two tools instead of one. If the design is still moving, a soft prototype tool is cheaper and changes faster. And on abrasive glass-filled resins, a pre-hardened tool wears at the gate within the run, turning a saving into rejects.
How Do You Cut Tooling Cost Without Adding Risk?
Cut tooling cost by matching steel grade and cavity count to the actual volume, keeping side actions to a minimum, using standard mold bases, and completing the DFM review before steel is ordered. Cutting cost by shortening tool life below the program volume usually moves the spend into unit price, scrap and maintenance instead.
- Size cavity count to volume, not ambition. A 4-cavity tool running 6,000 parts a year ties up capital in cavities that never earn their keep, and every cavity adds maintenance surface.
- Choose steel grade from required tool life. P20 is reasonable to 100,000 shots; hardened H13 or S136 is economical beyond 500,000, where re-cutting a worn tool would cost more than the original steel upgrade.
- Design out undercuts before pricing them. Each slider or lifter adds tool cost, a maintenance point and cycle time, while re-orienting a snap-fit to release in the draw direction is free at the drawing stage.
- Standardise mold bases and components. Standard bases, ejector systems and water fittings shorten build time and keep spare parts available, which reduces downtime over the tool's life.
- Justify the hot runner with arithmetic. Hot runners cut runner scrap and cycle time on thick parts but add heater zones, thermal expansion and a colour-change penalty; on short runs a balanced cold runner is often cheaper overall.
- Freeze the surface finish early. Changing a texture after the tool is cut means stripping, re-etching and re-polishing the cavity. One grain specification per product family removes that risk.
- Plan one correction round into the schedule. Budgeting for a single T1 correction costs far less than an unplanned second round under launch pressure.
The useful comparison is never tool price against tool price, but total program cost: tool amortisation per part, unit price, scrap, secondary operations and the cost of any change made after the steel is cut.
FAQ
How much does a prototype mold cost?
A simple single-cavity prototype tool in aluminium typically costs USD 1,000 to 8,000 for a mid-size part of up to about 200 g. Multi-cavity prototype tools, parts with side actions and parts needing a specific texture push the price toward USD 10,000 or more. A prototype tool is priced to answer design questions, not to run production volume.
How long does it take to build an injection mold?
Prototype tooling typically takes 3 to 6 weeks; bridge tooling takes 5 to 10 weeks; a multi-cavity production tool takes 8 to 16 weeks. T1 sampling and correction adds 1 to 3 weeks. Steel delivery, hot-runner manifolds and polishing capacity are the usual causes of delay, and customer approval sits on top of the tool shop's schedule.
Is aluminium tooling good enough for production?
Aluminium tooling is adequate for runs of up to a few thousand parts, and it can be the right choice for large, simple parts where cycle time matters, since aluminium cools faster than steel. It wears faster, particularly at the gate, and dimensions drift as it wears. It is not suitable for abrasive glass-filled resins or long production runs.
How many shots does a production mold last?
A hardened steel tool in H13 or S136 at 48 to 52 HRC typically runs 500,000 to 1,000,000 or more shots with scheduled maintenance. Pre-hardened P20 tools typically reach 100,000 to 500,000 shots, and aluminium tools 500 to 5,000 shots. Maintenance covers polishing flow surfaces, re-cutting gates and replacing ejector pins and seals.
When should you pay for steel tooling instead of a bridge tool?
Pay for steel tooling when annual volume exceeds roughly 10,000 pieces, the design is frozen, and the unit-price difference repays the tool cost within 6 to 12 months. Order it 8 to 16 weeks before parts are needed. If launch timing does not allow that, a bridge tool covers the gap — but plan both tools together.
Conclusion
Prototype, bridge and production tooling are three answers to three different questions, and cost, lead time and tool life are what separate them. Decide by volume, by design maturity and by the tolerance the part actually needs, then confirm the decision at a DFM review before any steel is ordered.
Send us your part model, the annual volume you are planning for and the tolerance on your critical dimensions. We will review the geometry, recommend the tooling stage and cavity count that fit, and quote a tool price and lead time against it.
Contact Us
Xiamen Yistar Precision Manufacturing Co., Ltd
Address: Room 401, No. 37 Huliyuan, Tong'an District, Xiamen, Fujian, China
Phone / WhatsApp: +86-18064076912
Email: info@yistar-plastic.com
Open Hours: 24 Hours
Contact Yistar with your part model and volume forecast for a tooling stage recommendation, a mould cost band and a build schedule before you commit to steel.